Manual
BEST BROWSER OPTION
Best Browser Option

To achieve best results with the application utilization, we strongly suggest that you use Google Chrome. If you don’t have it, you can download it from: https://www.google.com/chrome/browser/desktop/index.html

The second best option would be Microsoft Edge and it can be downloaded from: https://www.microsoft.com/en-us/windows/microsoft-edge
After you are sure you have the proper browser to navigate, you can proceed to the login screen.
LOGIN
Login
Access https://bp.crunchflowapp.com in your browser. You will be prompted to the login screen.

Enter your login credentials and click the blue login button. You will be taken to the Welcome screen.

Resetting your password
If anything goes wrong with your password, you can click on the ”Forgot your password”, Click here button, right below the login screen.
 Then type in your e-mail and click on the Reset button.

You will receive an e-mail with the instructions on how to Reset your password. Inside the e-mail, click on the blue “Create New Passoword” button or copy and paste the url into your browser.

You will be taken back to your browser and a reset your password screen will be prompted. On screen, type your new password and confirm it.
 You will be taken back to the login screen. Follow the login instructions.
NAVIGATION THROUGH THE MODULES AND MAIN MENUS
Login
After you are logged in you will be able to see the modules that you have access to per the permissions set for you by the system administrator. To do that, in the welcome screen, go to the upper right corner and click in the Modules Menu.

Identify the module you want to access and click on it (in this example, WORK).

At that moment you will be in the WORK Module and will be able to see the Main Menu for that module in the high bar of the system. The menu page you are on will be highlighted with a green bar under its name (in this case dashboard).
To navigate to other pages, just click on their names in the main menu of the module (for example, project).

To return to welcome page, just click on the Crunchflow logo on the upper left side of the screen.
To navigate to other modules, just click on the Modules Menu at any time.
CRM Module
CRM Module
On the welcome screen (or while you are in any module), click on the modules menu in upper right corner and the click in CRM box.

You will be taken to the CRM Module. If you have all permissions to navigate through this module, you will be taken to the client’s page. From this point on you can navigate through this whole module using the main menu located in the upper bar of the application.
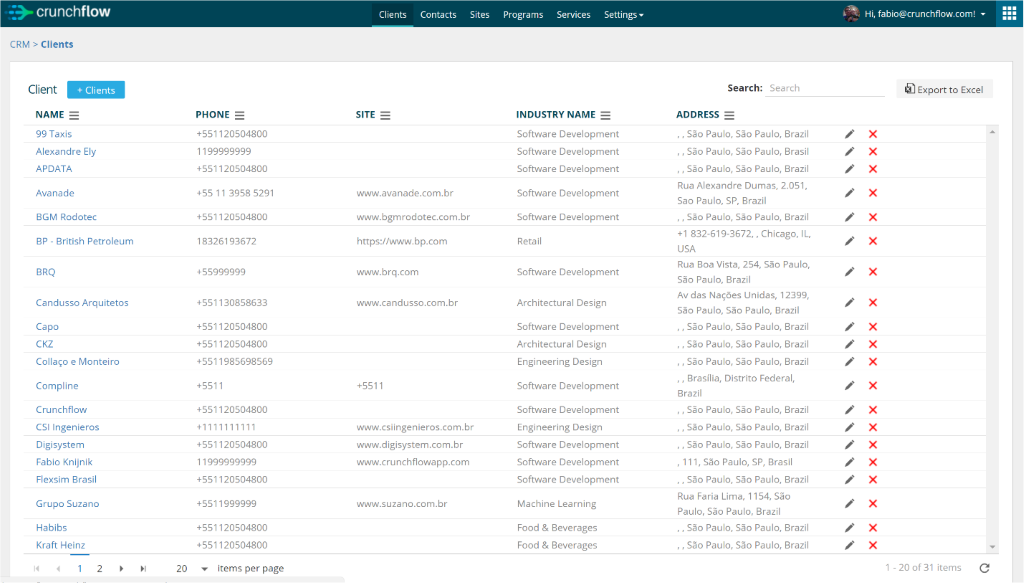
CLIENT
CLIENT
If you have access to it, you will be taken directly to the Clients screen.
To add a client, click on “+ Client”.
![]()
Then, input all client’s information.

To search for customers, use the search bar, located in the upper right corner of the grid.

Clicking on the button will download the list of clients to a Microsoft Excel® worksheet on your local computer.
![]()
To access a client’s information, click on the client’s name.

You´ll be taken to the client´s details page and there you can edit the information, add or edit contacts and view all contracts, programs, projects and revenue linked to that client.

You can edit the information of a client clicking in the pencil right beside the profile.

To add a contact, click in the “+ Contact”:
 Then insert all information needed and hit “Save”:

To edit a contact, click on the “edit” button, represented by the pencil.

Nas telas a seguir é possível acessar os Contratos e Programas referentes ao cliente selecionado.

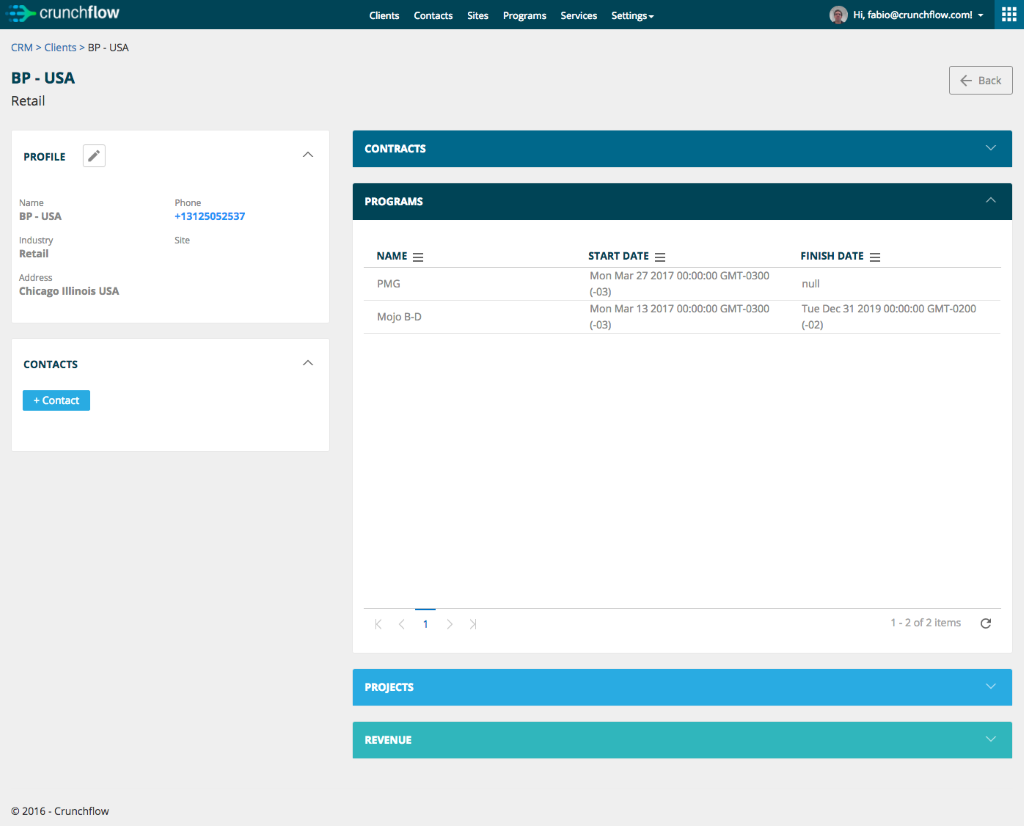
Mais abaixo estão os Projetos e Receitas.


To go back to the client´s list, click on the back button or on “clients” in the main menu.
![]()
![]()
CONTACTS
Contacts
When you click “contacts” in the mains menu under the CRM module, you will be taken to the main GRID with a list of all the contacts you have permissions to see.

To add a contact, click on “+ Contact”.
![]()
Then, input all contact´s information.

Para pesquisar por contatos específicos, utilize a barra de pesquisa, localizada no canto superior direito da grid.
Clicking on the button will download the list of contacts to a Microsoft Excel® worksheet on your local computer.
![]()
To access a contact´s information, click on the contact´s name.

You´ll be taken to the contact´s details page and there you can edit the information, edit contact´s information and view all contracts, programs, projects and revenue linked to that contact.

To edit a contact, click on the “edit” button, represented by the pencil.

Then, edit all contact´s information.

É possível acessar a página do cliente referente ao contato, clicando em seu nome:

Nas telas a seguir é possível acessar os Contratos e Programas referentes ao contato selecionado.

Mais abaixo estão os Projetos e Receitas.
To go back to the contact´s list, click on the back button or on “contacts” in the main menu.
![]()
![]()
SITES
Sites
When you click “sites” in the mains menu under the CRM module, you will be taken to the main GRID with a list of all the sites you have permissions to see.
The list of sites you have access to will appear. If you need access to a site not listed, please send your request to siteaccessrequest@crunchflow.com.

To search for a specific site, enter your query in the box on your browser.
For example, typing in “SOUTH”, will bring up all sites for which your login is allowed access and which have “SOUTH” somewhere in the site information.

The more detailed the information you search for, the more accurate the result will be.
![]()
Clicking on a site name, will bring up the detailed site information for that site.
Clicking on the button will return you to the list of sites accessible to your login credentials.
At the top of the site information screen, will be a site profile and aerial view of the site location along with site’s address.

In the section below it, you will be able to see the site live camera feed in the Site Camera section.

Scrolling down, you will be able to see the programs and projects associated with that site

Clicking on the project name, you will be taken to the project details of that project, if you have access to it.

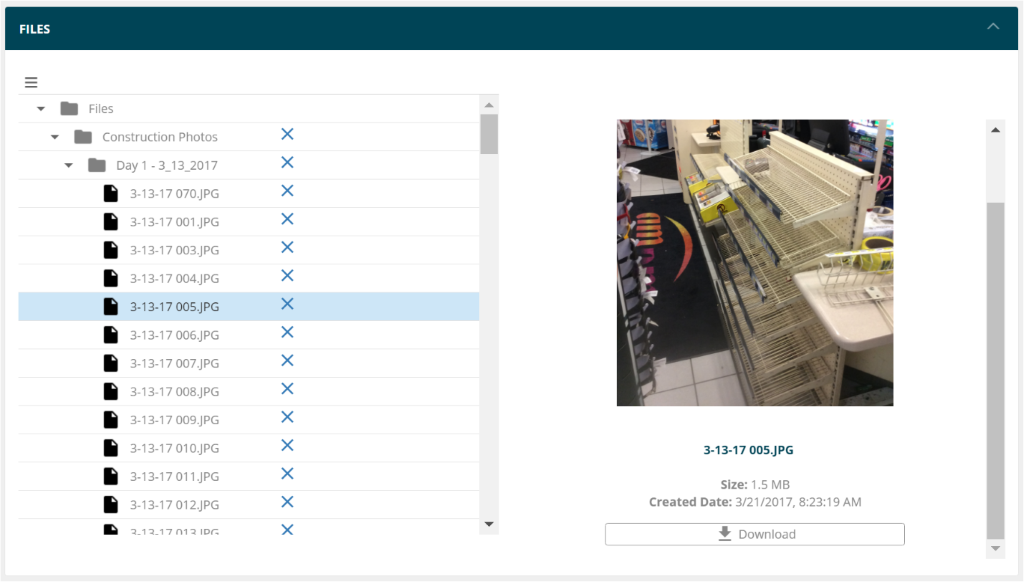
If you want to check the files of this site, keep scrolling down and you will get to the files that are uploaded under that site.

By clicking into one specific folder you will be able to see the thumbnails of the files that are inside that folder on the right side of the screen

You can then download the files using the download button or click on the thumbnail to enlarge the picture in your screen and navigate to the next (or previous) picture using the arrows on each side of the page.

If you want to close it, you just have to click on the “x” button above the picture and you will return to the site page and its files.
If you click on one specific file, you will be able to see its thumbnail, basic information and the option to click on Download so that the file will be downloaded to you computer
Repeat file selection for all files which you will need to have downloaded to your local computer.
To return to the list of available sites, click on Sites at the top left hand corner of the browser.
![]()
![]()
Clicking on the button will download the list of sites to a Microsoft Excel® worksheet on your local computer.
PROGRAMS
Programs
When you click “programs” in the mains menu under the CRM module, you will be taken to the main GRID with a list of all programs you have permissions to see.

To add a program, click on “+ Program”.
![]()
Then, input all program’s information.

Para pesquisar por programas, utilize a barra de pesquisa, localizada no canto superior direito da grid.
No botão ao lado da barra, é possível exportar os dados para um arquivo Excel.
![]()
To access a program´s information, click on the program´s name.

You´ll be taken to the contact´s details and there you can edit the information.
Também é possível editar o programa clicando no botão representado por um lápis ou excluí-lo clicando no X, ambos localizados no final da linha.
